Fun and games!

July 17, 2008

The online fun and games are back at Heifer International. There are coloring sheets, a memory game, a cow-culator, word searches, crossword puzzles and much more. You will find it all at

Fun and Games at Read to Feed

We are enjoying the color sheets

You can find more information about the Read to Feed program here. Download reading logs here.

Thank you for those of you that have already donated and for all of you that are joining us on our reading adventure and have started reading to help feed others!

Do you have a favorite book and craft you would like to share? Please e-mail me at cindyhopper(AT)gmail(DOT)com

Happy Fourth of July

July 4, 2008

2008 Parade Grand Champions —YIPPEE!

Uncle Sam Hat Party Favors

July 3, 2008

Just a little clue to the theme of our float! I am making these little favors for my breakfast table this year to go with the patriotic pinwheels.

I took about a 3″ circle of tissue paper and glued it to the top of a toilet paper roll. Next I printed the Uncle Sam Hat Party Favor download on card-stock. I used a glue stick to attach it to the toilet paper roll. I then filled the tube with goodies and attached a 3″ red card-stock circle with a glue gun. I printed the circles on a piece of red card-stock to make it easier for me. You can find what I used for the brim of the hat here. (Make sure you print full size–no scaling, so the downloads fit the toilet paper roll properly.)

Patriotic Pinwheels

July 1, 2008

We are busy around here preparing for the BIG day! I will again have everyone for breakfast before the parade starts. Here is what I am working on for the tables.

The container is a cardboard Uncle Sam hat from the party store filled with hydrangeas and patriotic pinwheels. If you would like some patriotic pinwheels to help decorate for your Fourth of July celebrations you may download them here.

Large Patriotic Pinwheel

Medium Patriotic Pinwheel

Small Patriotic Pinwheels

Print template on card-stock, cut out, fold tips to center and fasten with a long pin through black dots. The pinwheels can be attached to a pencil by pushing the pin into the pencil eraser. I needed a longer stick so I placed a cap pencil eraser on a 5/16″ dowel rod that I painted blue. I found they really spin well if you add a pony bead for spacing. A star cut out would be a nice touch on the front where the pin is placed.

now back to working on the float….

Summer Lunch

June 25, 2008

I had lunch today with two sweet nieces and an awesome sister-in-law. If you are looking for a simple and delicious menu, give this one a try!

We ate outside and each place had a tissue paper flower party favor filled with chocolates. I used these instructions, but used toilet paper rolls cut in half (what I had on hand at 10:00 pm) instead of the clear acetate containers. These were simple to make and inexpensive.

We ate salad with mandarin oranges and candied almonds along side a tomato pie.

Tomato Pie

4 large tomatoes, peeled and chopped
10 fresh large basil leaves chopped
1/4 cup finely chopped green onions
1/2 cup grated sharp cheddar cheese
1/2 cup grated mozzarella cheddar cheese
1/2 cup mayonnaise (I used Hellman’s light)
1/2 cup sour cream (I used light)
salt and pepper
1 9″ pre-baked deep dish pie shell

Lightly sprinkle tomatoes with salt and place in a colander to drain for at least 15 minutes. I prepared all of the ingredients early in the morning and then assembled just before baking. This gave the tomatoes plenty of time to drain to keep the crust from being soggy.

Combine grated cheeses, mayonnaise and sour cream.

Mix tomatoes, basil and onions and spread in the bottom of the pre-baked piecrust. Spread cheese mixture on top. Bake at 350 degrees for 30 minutes or until lightly browned and bubbly.

Let set 15-20 minutes before serving. This is also good served at room temperature.

Mandarin Salad Dressing (from my friend Jenny)

Mix the following in a container that can be shaken:

1/4 olive oil
2 T red wine vinegar
2 T sugar
1/2 tsp salt (I use Kosher)
a dash of Tabasco pepper sauce
1 T chopped fresh parsley

I think it is best to make this dressing ahead of time to allow the flavors to come together and fully get the sugar dissolved. Shake well before dressing the lettuce. This makes enough dressing for about 4-5 nice size salads (about 6 to 7 large handfuls of lettuce)

Candied Almonds

In a dry skillet place 3 T sugar and heat over medium heat. As soon as you see any of the sugar melting add in 1/2 cup slivered almonds. The sugar will turn to syrup and coat the almonds. As soon as you see the slightest color change on the almonds– remove from heat. The almonds will continue cooking and it is very easy to burn them. Sometimes when I make these I get more of a crystallized looking coating. It doesn’t matter—is is all good!

Toss mixed greens with dressing, a regular sized can of drained mandarin oranges and the candied almonds. Serve immediately after dressing the salad.

For dessert, Miniature Cherry Cheesecakes

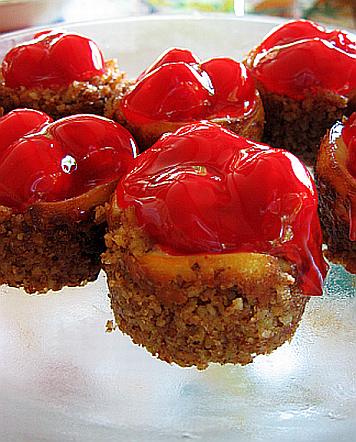
I used this pan, but I think these could be easily made in mini muffin tins.

Cherry Cheesecakes

1 8 ounce package of cream cheese (I used light)
1 egg
1 teaspoon vanilla
1/4 cup sugar
1 cup ground pecans
1/3 of a stick butter melted
3 T sugar
1 can cherry pie filling

Spray pan with nonstick spray. Blend cream cheese, egg, sugar and vanilla. Set aside. Mix ground nuts with butter and 3 tablespoons sugar. Divide the nut mixture between 12 cups. Press in bottom and up sides. Fill cups evenly with cream cheese mixture. Bake about 14 minutes at 375 degrees. Let cool on rack about 20 minutes and then remove from pan. Place cherries on top. Refrigerate until ready to serve. These freeze beautifully without the cherries on top. Makes 12 miniature cheesecakes.

Enjoy!

Oh and for drinks, try a little lemon-AID!

Here is a printable version of the recipes

summer-lunch-recipes

You are invited

June 16, 2008

to read along with us! Please join us for our Read to Feed project! More details about the program can be found here.

You may download a reading log.

reading-log

You may also like to download this little informational sheet and sponsor pledge form. You can tape them on the outside of each side of a manila envelope to hold all of your pledges.

sponsor-form-side-1

sponsor-form-side-2

If you are participating please leave a comment and I will post a link to your blog on my side bar.

The first 50 people to contribute their reading pledges to our team will receive a copy of the book, Beatrice’s Goat, from Heifer Project International. Our goal is BIG but together we can do it!

Copy and paste the following code for a button for your sidebar:

<a href=”https://skiptomylou.wordpress.com/2008/05/30/lets-read-to-feed”><img src=”https://skiptomylou.files.wordpress.com/2008/05/button1.jpg?w=199&#8243; /></a>

Making Doughnuts

June 5, 2008

Today we were busy baking and making. With Arnie the Doughnut by Laurie Keller as our inspiration we filled our tummies with yummy doughnuts.

We used 101 Cookbook’s recipe for baked doughnuts. They were (yes we ate the whole 1 1/2 dozen YIKES) delicious. I would like to believe they were healthy since they were baked—but they were dipped in butter and rolled in cinnamon sugar. We were able to make the entire recipe in the food processor. This makes quick time of the kneading (we counted to 45 slowly and it was done).

And so you don’t think we are only about weapons around here, we made felt doughnuts too. My eleven year old was amazing with his needle and his sister was thrilled to have some new play food.

First we cut out our felt circles. You may use our template if you like.

doughnut-template

Sew the frosting to one of the doughnut pieces.

My son then sewed “sprinkles” all over the “frosting” with embroidery thread.

With right sides together sew doughnut pieces together, leaving an opening for turning

Turn doughnut right side out.

Stitch completely around the center of the doughnut. We found this easiest to do on the sewing machine. Stay as close to the edge as possible, catching the top and bottom layers.

Stuff doughnut and slip stitch dounut closed!

Ta Da!

We hope you will consider reading along with us to Reed to Feed! This funny and superfluous story gave me pause. As we are reading and eating I am reminded of how lucky we are to have an abundance of food. We can “play” with our food. This it not the case for so many. As a world population over 800 million people will go hungry today.

Let’s Read to Feed!

May 30, 2008

Let’s go for it, let’s think big! This summer let’s empower our children and help them discover that they have the power to change the world.

While we are encouraging our children to read this summer we can be helping poor families all over the world! Read to Feed is a reading motivation/service learning program from Heifer International. Children are inspired to read more books for pleasure, while raising money, through sponsored reading, to help end world hunger and improve the environment.

I first became aware of this program when we lived near the Heifer Ranch in Arkansas. Our family read the book “Faith the Cow.” By the end of the book our eyes were filled with tears but our hearts were full of hope! Heifer International is truly a wonderful organization.

What is Heifer International?

“Heifer International works to end world hunger and save the earth. For close to 60 years, Heifer has helped more than four million impoverished families in 128 countries lift themselves out of poverty and achieve self-reliance.

The idea is simple and it works. Instead of providing hungry families with a non-renewable source of food, Heifer International provides a “living loan” of an animal. The family’s health and standard of living is greatly improved by what that animal can provide. This might be milk from a cow or goat, eggs from poultry, meat from rabbits, draft power from water buffalo or wool from llamas.

Key to success of the program is that Heifer provides extensive training in animal care, ecologically sound agriculture practices and community development. The result is to transform not just families, but the environment and community.

Another key cornerstone of Heifer International is “passing on the gift.” Families who receive an animal repay the loan by passing on one or more of the animals’ offspring to other needy families. That family passes on their gift to another family and so on. So one gift multiplies through the community.

Heifer International currently provides more than 27 types of animals that provide food and/or income to struggling families in 48 countries (including the U. S.)”

So what do you think? I think that if we all work together we can purchase an Ark of animals.

I know this is a lofty goal but lets think big! We would have to tell everyone we know. We would have to ask every child we know to start reading and to ask for sponsors. Once children receive money for reading their books they can go here and make their donation. You may click on this page at any time to see a running total of how much we have collected. The site accepts credit cards. I am sorry but the minumum donation is $10.00. If you were wanting to make a smaller donation, maybe you and a friend could make a donation together. Join as a team member and you will have the ability to e-mail friends, solicit donations and make your donations in your name.

The Read to Feed website is full of fantastic learning materials, fun and games! I will try to highlight some of the materials here in the coming weeks. I will also try to post a little review about some of our favorite books and a craft each week.

I hope you will join us on this little reading adventure this summer! Together we can make a difference!

Copy the code below if you would like a button for your sidebar:

<a href=”https://skiptomylou.wordpress.com/2008/05/30/lets-read-to-feed“><img src=”https://skiptomylou.files.wordpress.com/2008/05/button1.jpg?w=199” /></a>

How to make a duct tape bullwhip

May 29, 2008

If you have come looking to make TRULY dangerous toys for boys you are at the right spot! Or maybe you have finally succumbed to the constant whining about “needing” a bullwhip since the release of the new Indiana Jones movie.

Thank you to Wesley Scoggins Indy Mogul for the clever idea to use duct tape!

You will need:

  • Brown “duck” tape (we found this at Wal-Mart) cut into 3- 12 foot lengths
  • 10″ piece of 3/8″ wooden dowel rod
  • a foot or so of twine for the “popper” if desired

Begin by placing two chairs 12 feet apart. Place three strips of tape between the chairs.

Fold each of the pieces of tape in half length ways-leave attached to chair

Leave tape hooked on one of the chairs and begin braiding. Braiding 12 feet of duct tape isn’t really pleasant but is certainly less painful than paying $50.00 plus for a bullwhip! We tried several methods: hanging it up high, laying it on the ground. We found it easiest to leave it attached to the chair and have another person help untangle the strips of duck tape as you braid. My eleven year old was able to do most of the braiding.

Once you have reached the end take another piece of tape and wrap around the braid to fasten off.

Remove the other end from the chair and attach these ends of tape to the wooden dowel.

Begin wrapping the dowel with tape until you have completely covered the handle. When finished we took a small piece of tape and covered each end and then wrapped a small piece once again around the dowel to make it secure.

If you want to make the popper you tie it on like this

Finished! How does it work?—–probably not well enough to kill someone or allow you to hang from a tree (we’re trying though) but well enough to cause some damage to your house and possibly harm to a friend, so please be careful!

Marbleizing Paper

May 25, 2008

To make this fun and easy marbleized paper you will need: 1/2 tsp alum (helps paint adhere to the paper), 2 cups liquid starch, liquid acrylic paints, a long wooden skewer , a 9 X 13 pan and white copy paper cut to fit the inside your pan. You can change up the size of the pan, just keep the proportions of starch and alum the same. The starch should be 1 to 2 inches deep in your pan.

marbelizing-paper-006-1.jpg

Pour 2 cups of liquid starch in the pan then add 1/2 tsp alum stirring until mixed.

marbelizing-paper-002-2.jpg

Gently drop acrylic paint on the surface of the starch. Some paint will sink to the bottom- do not worry. Try not to use too much paint. For best results choose light and dark colors that go together. It will take some experimenting to know how much paint works best for you. Brands of acrylic paint differ in consistency. If after several tries you have trouble with the paint not staying on the surface, try adding a drop of water to your paint.

marbelizing-paper-001-3.jpg

Take the wooden skewer and drag the paint through the starch. Continue dragging the skewer through the paint until you get a design you like. You might try other tools like a fork, feather or comb besides the skewer. Really the fun of this activity is watching the paint swirl around making different designs. There is no right and wrong. Enjoy the experimenting. We were mesmerized —- we hope you will be also!

marbelizing-paper-003-5.jpg

Lay your piece of paper on top of the starch. Allow it to sit for a couple of seconds.

marbelizing-paper-005-4.jpg

Lift the paper out of the pan and allow the starch to drip off the paper

marbelizing-paper-004-6.jpg

Rinse the paper under running water removing any extra starch. This does not change the intensity of the colors (the below photo is a different piece of paper paper from the above photo)

marbelizing-paper-010-7.jpg

After the paper has been rinsed, lay it out to dry. It will take about two hours for the paper to dry. When the paper is completely dry, iron on medium setting until the sheets of paper are flat.

You may find that you can print two sheets of paper before adding more paint to the starch. In the photo below, the bottom piece of paper was made first. We then used our skewer again making a different design and put on another sheet of paper.

marbelizing-paper-007-8.jpg

In the photo below we had too much paint on our starch so we went ahead and made a print then changed up the design and then made another. If you feel that you have made a lot of prints and your starch is too full of paint, just pour it out and start again.

marbelizing-paper-001-9.jpg

The possibilities of what to do with your paper are endless—- cover pencils, a book or a box, make note-cards, book marks or a picture frame etc.

Have fun!

2008 View from my bed

May 11, 2008

I can’t believe how my kids have grown!

and I noticed the breakfast gets better if they think it might get a picture on the blog!

Thank you all for sharing in all my ‘mom activities’ this year! You truly do make my world brighter by stopping here! 

I hope you have a very happy Mother’s Day!

Cindy

Lunch time!

May 8, 2008

A group of friends and I share a tradition of taking our kids’ teachers lunch during teacher appreciation week. We tally up the amount of lunches we need, notify our teachers and then gather in the morning to assemble the lunches. One friend makes delicious chicken salad, another brings croissants for the sandwiches, one brings fruit, another makes wonderful pasta salad and another awesome brownies. I take care of the packaging. Last year I made these sacks. This year I made oilcloth lunch sacks.

I first made a pattern out of cardboard measuring 15 x 12. Cut a 2 1/2 inch square out of each bottom corner.

Take two pieces of oilcloth right sides together and draw around your template. Cut out. I used small clothes pins to hold the pieces together.

I used pinking shears to cut across the top (very optional- I thought it gave the edge a finished look)

Sew down each side and across the bottom. I used a stitch length of 5 and 1/4 inch seams on the entire bag. My machine handled the oilcloth beautifully, but If you have any troubles, Sew Mama Sew has a wonderful article on sewing with oilcloth.

Fold in bottom of bag bringing bottom seam and side seam together

Pin bag bottom to bag side with clips

Sew across on each side

Turn bag right side out and fold in top of bag about 1/2″ and then top stitch

Measure about 2 1/2 inches from middle side seam on all four corners, finger press, clip with clothes pins

Top-stitch closely to the corner fold on each of the four sides

Finished!

Happy May Day!

May 1, 2008

We used children’s straw purses from the dollar store as our baskets for our May Day flowers today

I hope your day was happy!

May Day

April 27, 2008

May Day is just a few days away. Here is a little download for a simple cone and gift tag.

may-day-cone-template

Print out on card-stock or decorative paper(my paper was two sided so that is how I got the solid tag and printed cone), roll into a cone shape and then glue. I had pretty good luck with a glue stick (when tiny hands were present) but hot glue is more sturdy. Embellishing the cones with drawings, trims, glitter, stamps, cut-outs, is a great family project————but nothing is more fun than the “ding and dash!”

Appreciation 7 days a week

April 22, 2008

This year for teacher appreciation week we will be giving each teacher a “days of the week” pill box filled with little treats and sayings. I found the pill boxes at the dollar store.

You may download the sayings if you like –

teacher-appreciation-sayings

(I didn’t use the “We are lucky to have you for a teacher” saying. It would go nicely with a lottery ticket!)

Fabric covered tacks fill one of the compartments to tell them they are sharp!

I used Jessica Jones’ fabulous instructions to make the fabric covered thumbtacks

Some purchased colorful clips fill the next compartment

Next up marble magnets

These are simple to make with glass gems (floral department at the craft store), E600 craft adhesive, a 3/4 inch hole punch, 3/4 inch magnets and decorative scrapbook paper, wrapping paper and or magazine scraps. First punch out a circle and glue it to the back of the glass gem. I removed air bubbles by moving paper in a circular motion to distribute glue evenly and then pressing hard. Allow to set. Next glue the magnet to the back of your papered gem. I found it necessary to sort my glass gems to find the largest ones with no scratches or imperfections. If your glass gems are smaller try using a 1/2 inch hole punch and 1/2 inch magnets.

A measuring tape tells our teacher that they really measure up

Change for the soda machine fills another compartment

Small little post-it notes (the kind for marking a page) just fit to say, “Just a note to let you know we think you are a wonderful teacher!”

Some mints to say thank you

Wrapped all up with a little gift tag that reads:

A daily gift for all you do,
Teaching my child each day through.
Making a difference without taking a rest,
As a teacher, you’re one of the best!

teacher-appreciation-gift-tag-for-pill-box

Hopefully our teachers will feel appreciated each day!

What’s for lunch?

April 8, 2008

How about a ham, roast beef and Swiss pita with tomato and lettuce and a bag of chips?

 felt-pita-and-chips.jpg

This little lunch is for my niece’s birthday.  I could easily become addicted to making felt food. 

Geocaching

April 3, 2008

Geocaching is an outdoor treasure-hunting game in which the participants use a Global Positioning System (GPS) receiver or other navigational techniques to hide and seek containers (called “geocaches” or “caches”) anywhere in the world. A typical cache is a small waterproof container containing a logbook and “treasure,” usually toys or trinkets of little value. Today, well over 540,000 geocaches are registered on various websites devoted to the pastime. Geocaches are currently placed in over 100 countries around the world and on all seven continents, including Antarctica.

From Wikipedia, the free encyclopedia

Over spring break we found ourselves with nowhere to go and nothing to do, only made more painful by the long list of friends going to exciting places. We decided to make our own fun by Geocaching.

geocaching-1a.jpg

By registering at the website and typing in your address you might find hundreds of hidden treasures right in your neighborhood, we did. Once we found our locations, printed of the details, borrowed a GPS we were off—–well it is not that simple, you know the drill–snacks, jackets, drinks………. So after we were prepared as we could be, we were off.

We found our first cache fairly easy—-THANK GOODNESS. You know I had an audience that I was trying to sell on this whole deal (and a 15 year old can be very skeptical!) . This activity NEEDED to be more fun than going to the beach or snow-skiing!

geocaching-1.jpg

Our first cache not only was easy to find but had some special treasures. Each cache can be filled with different items, usually small trinkets.

geocaching-2.jpg

Some have “travel bugs” and we were lucky to find one in our first find.

geocaching-michael-the-eagle.jpg

Each child chose a little trinket from the cache and in return they each left one that we had brought from home.

geocaching-3.jpg

We logged our visit in a log book that is usually included in each cache.

Our next cache led us on a wild goose-chase–never to be found.

Our third cache was a wild trek over a barbed wire fence, a boggy field and a small creek, but we did score! This one had a “geocoin.”

little-hopper-geocoin.jpg

The “Travel Bugs” and “Geocoins” are registered by entering their code on the internet when found and then moving them to another geocache. You can watch them move along from cache to cache online.

Our next outing was a multiple cache at none other than a cemetery. Let’s just say it was really really hard and again trying desperately to keep my troops happy I begged the gravedigger (literally) in his backhoe for a clue! Having problems with the second part of the clue we again searched out the gravedigger (now digging a grave) for more help. I am sure this clue asking is NOT okay so if you are a die-hard geocacher or the geocacher police please remember I am out alone with a 15 year old, an 11 year old and a three year old on my back in a backpack—-this justifies clue asking. Finally the two micro caches led us to the final cache. Of course, it happened to be right by where they were digging the grave so all the workmen cheered for us! It only takes us a little applause and now we are totally into geocaching.

All in all it was great fun and we made some great memories! We are the KansasGrasshoppers and we left calling cards in all of the caches we found—-see if you can spot one!

Wishing for Spring weather

March 29, 2008

with bluebird cupcakes!

bluebird-cupcake.jpg

The marshmallow Peep is sitting on green apple ‘candy grass’ that I found in the Easter section at Wal-Mart.  It is distributed by Galerie in Hebron, Kentucky. http://www.galerieusa.com 1-859-538-8500. My son said it tastes like styrofoam –(now how do you think he knows this?) I will agree with him that it didn’t taste good. 

More Teacher Appreciation Ideas

March 26, 2008

National Teacher Appreciation week is the first full week in May.  National Teacher  Day is May 6, 2008.

Here are some ideas that can be done for the entire teaching staff at school.

Place a large poster in the Teacher’s lounge that says, “We think you are ‘souper’!” and serve a soup lunch. We do this for our teachers on a day that there are no classes but they are required to be at school— like for parent teacher conferences or an in-service day. We place little notes in the box ahead of time inviting them to the special lunch. Parents are asked to send a crock pot of soup so the cost for this is very little.

Late fall or winter place a basket of hot cocoa mixes, instant flavored coffees and spiced cider packets in a basket with a sign that says, “You warm our hearts!”

You can ask parents to donate homemade breakfast goodies and invite the teachers to “A breakfast of champions!”

Supply the teacher’s lounge with cupcakes decorated with lots of pretty frosting and post a sign that says, “Our teachers are the icing on the cake!” or make cakes and have the sign read, “Our teachers take the cake!”

Place a pack of gum in each teacher’s mailbox and say, “You’ve chewed through 1/2 the year. Keep up the good work.”

Place a Power bar in each teacher’s mailbox and a note saying, “We hope this energizes your day.”

Place some store bought tins of flavored popcorn, homemade caramel corn, or packages of microwave popcorn in the teacher’s lounge with a note that says, “Have a popin good day!”

Have the student council or a group of parents wash the teacher’s cars or only car windows. A few days before let teachers know you are planning to do this by putting a note in their mailbox that says, “Thanks for making everything ‘clear’ We are treating you to a free car wash!

Make a sign that says, “Our teachers are the sweetest.” Have parents bring in sweet treats or provide a chocolate fountain and fresh fruit.

Hire a few massage therapists that will come to the teachers lounge and do chair massages. Usually massage students are willing to do this for a reasonable rate. Let teachers know about this special treat by sending them a note that says, “You deserve a pat on the back!”

During parent teacher conferences we put boxes of of conversation hearts in each teacher’s mailbox. We included a note that said, “Hoping your ‘heart to heart’ conversations are sweet!”

Conversation hearts or any other heart candy could be placed in the teacher’s mailboxes with notes saying, “Thanks for putting your heart into teaching.”

At Easter put candy filled plastic eggs in the teacher’s mailboxes with a note telling them they are ‘Eggstra’ special teachers.

Put a lottery ticket in each teacher’s mailbox with a note saying, “We are lucky to have such great teachers!”

Other ideas can be found here

Happy Easter!

March 23, 2008

Our boy decorated bunny cake

bunny-cake.jpg

The Bunny Cake cutting diagram

bunny-cake-cutting-diagram.jpg